Thursday, September 20, 2012

Such a sucker

That's right, I'll admit it.
 I am a sucker for a cute face. Total sucker if that face is fuzzy.
 
I have been collecting 2 Cute Ink's images for a while now.
I started off with a couple of sting rays, and then a bunny, and then
came the little monster digis. Oh yeah, a cute and fuzzy monster!!
 
Oddly enough, I am using the current (for a very short time) freebie
available over at 2 Cute Ink's challenge blog. Only odd, since I have
so many to choose from, but not odd since it's an adorable bat with candy corns!!
The challenge is to use black, orange, and purple on your project, along with a 2 Cute Ink image. Extra points for using the freebie image, which is awesome!! 

Sooo cute!! Gave me an opportunity to use some of my cuter, DCWV
Hallowe'en themed paper. I have amassed quite a varied selection of Hallowe'en papers
to choose from. Right now I am really into last year's apothecary themed papers
for my more vintage and macabre creations. Still popular in my book! 
 
I used some black netted bag (plastic skulls from Mike's were in it) that I cut up, and
added to the oval layers for a little texture. Simple, but effective.
 
You really should drop by the 2 Cute Ink's shop and see what adorableness Heidi has for purchase. Then, stop by the challenge blog to pick up the freebie to play along in the challenge. It really is 2 easy to play along!!
 

Wednesday, September 19, 2012

"I'm melting.....!!!"

This week at HDH we are drawing our inspiration from
melted wax, candles, witches, melted flesh. Any type of
Halloween/Gothic themed melted musings will do just fine.  
 
I opted for a pictorial tutorial of some glue gun candle props.
 
 
Step 1:
First step is to gather your materials.
You will need a high temp glue gun and LOTS of glue sticks.
Empty paper towel tubes and/or toilet paper rolls.  

While the glue gun was warming up, I ripped the tubes to a desired
shape and height to mimic melted candles. 

Once the glue gun is warmed and ready, start covering the tube with glue.
Be very careful not to burn yourself and work over a protected, heat resistant
area.

I will be very honest at this point, and state that each fake candle takes
about 4 or 5 glue sticks EACH, to cover it to this stage. If you like the waxy look
of the glue you may want to keep adding glue until the tube is completely
covered. Once the glue hardens, it appears more opaque and wax-like.
I usually prefer to stop at this stage.  

Since I am running a bit low on glue sticks, I decided to take the next step and
paint each candle with white acrylic paint. The first time I saw this craft, it included
this step, but I haven't gone this far before. I'm figuring it just needs a base coat. 
Be sure to paint the inside of the tube as well.

After a single base coat of white, I then add multiple coats of fluorescent
green and yellow acrylic paint. My son walks in and says, "Ya know when you go to those run down carnivals and you go on the Haunted House ride? Your candles look
like the hokey black light stuff they have in there".  
 
Thank you!! That is EXACTLY the look I was going for!!
Perfectly heinous, low budget, haunted house props!!!
 
Oh, and I slathered on a healthy dose of glow in the dark paint too!!
I found my real fake tealights (not those weak ass Hello Kitty ones)
and they work excellent!!
I am quite pleased with my melted musings this week.
 
Drop by HDH and check out what else the Minions conjured up
for this week's challenge.


Sunday, September 16, 2012

Mister Roboto

Due to some recent, unforeseen tragedies, I have been unable to focus
on my blogging duties. When life tests you, it just doesn't let up!!
Positive thoughts. Rainbows and puppies. Whatever.
 
Anyhoo,
the challenge this week at Dilly Beans is ROBOTS!!
Megan has some wonderful new robot images available in her shop
and the DT just couldn't wait to color them up this week!
I have had this cute Recollections paper for quite a while.
It is perfect for this robot themed card.
 
I used #441 Sprockets Heart image.
Really great image for a masculine card. I have the hardest time with those.

I also finally got to use a sentiment stamp from a Robot set
I have had for years. Looks like I can finally make good use of them now.
 
Drop by the Dilly Beans challenges blog and get inspired to play long!!


Wednesday, September 12, 2012

Oh My Gourd!!!!


Well, another Wednesday has crept up on me, and caught me a little behind.
Nothing has gone as planned this week, especially my gourd project.
With it still being a little early in the season for pumpkins, I decided to use
a faux pumpkin for my project. I've had some for a few years and never got
around to actually carving them, but the monkeys at Mike's do it every year
for their check out counter lights and displays, so how hard can it be?
I watched a few videos with helpful hints and tips for a successful
fake pumpkin carving experience. I decided the easiest and fastest  
way was to use a Dremel. I think the key here is to use the correct bit.
I did not use the correct bit. I gave up immediately after the incorrect bit caught the
foam of the pumpkin and ripped a big plug of faux punkin foam out of my design.
Boo on power tools.
I ended up using the little saw they provide in the kit, a nail file, an X-acto knife,
a bastard file, and finally a rat tail file. Now doesn't all that sound so much easier
than carving a real pumpkin?!
No, no it doesn't.  
The actual kit is quite simple to use on the pumpkin once you have
carved it to your liking. Or to your disliking. I went with a very simple
design even though I really wanted to show off like Donna and Lady B.
They both went in the professionally finished and insanely detailed route,
which worked for them quite nicely.
I hung my pumpkin rather high so the neighborhood delinquents would have to
work really hard to give this guy a roundhouse kick or use it as a punching bag.
Don't even tempt them...     

And then the piece de resistance, I didn't have a freaking fake tea light
on hand except for a purple Hello Kitty one that was pretty weak.
Really?
Anyhoo, the Floating Pumpkin kit is pretty cool and would be great if
you hung a bunch in a display or from your trees. Very simple to use
and gives a great effect to your Hallowe'en displays.   
  
Since I wasn't feeling I had performed to my full potential this week,
I made an ATC using Andrea's awesome pumpkin digi and
few weeks ago. I used a Memory Box "Spooky collage" stamp
over the Copic colored pumpkin and added some distress inks,
a sticker, and a couple of rhinestones to finish it off. 
I may have redeemed myself.
 

Saturday, September 8, 2012

A wet nap in a shit storm

This past week has been a real shit storm.
Most of which I created, but it was a necessary evil.
That being said, I received some wonderful gifts that were
like a moist towelette in this crap fest going on.
They made a clean spot on my soul, that is for sure.
I needed that.
 
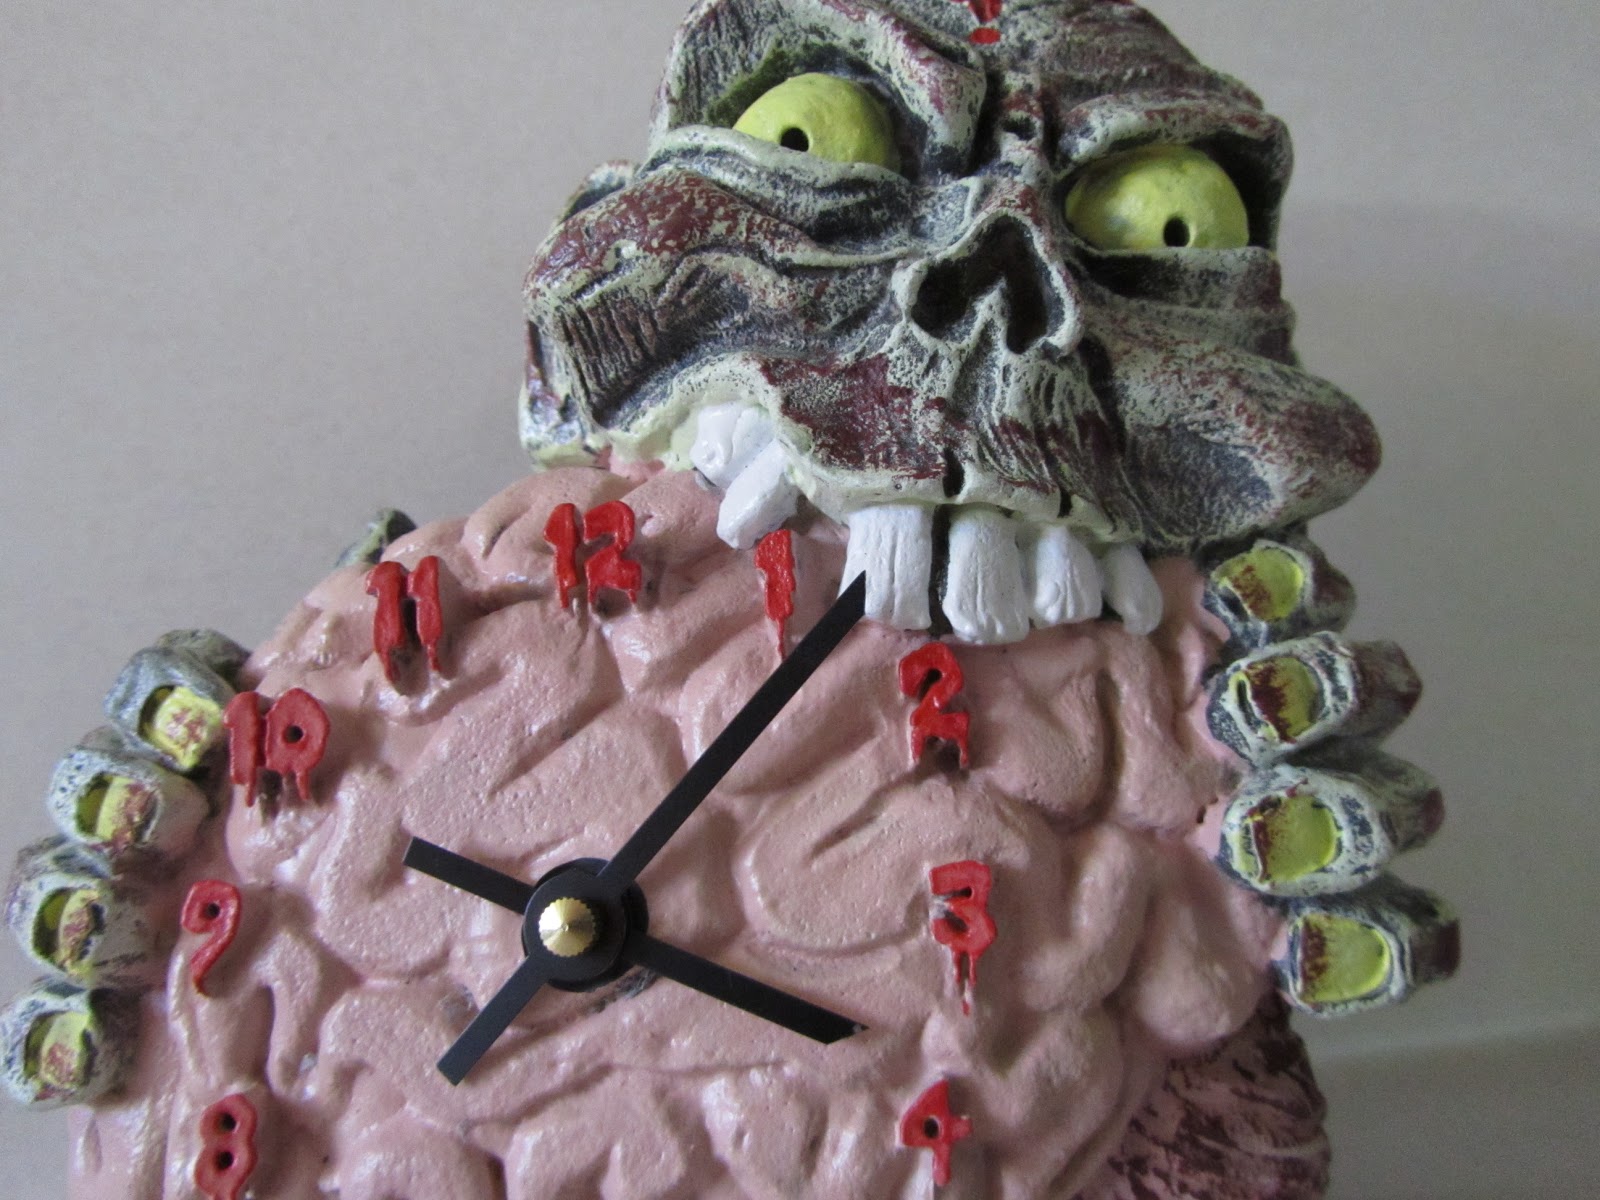
I was fortunate enough to have recently won this awesome Zombie clock

Coolest freaking clock ever!!!! I loves it!! 
 

I also had the pleasure of receiving this gorgeous paper bag book from
the always inspiring Nancy of Another MD Crabbie fame.  

I have always been a huge fan of Nancy's style and her inspiring
aged and distressed, dimensional projects. 

This little card can be removed so I can use all of the awesome supplies
like the pins, ball chain, ric rac, ribbon etc.. So cool!!

This card pulls out to reveal a zippered pouch chock full of
dimensional bits and bobs!!!
Basically, this is a Nancy craft kit. I LOVE it!!!

There is even another pocket on the back, full of dingle ball ribbon!
I loves dingle balls! Tee hee!!   

Even the back is decorated beautifully. Talk about details!!
A really stunning piece of art and a cherished gift.
Thank you, Nancy!! 

My friend came over to distract me from my deeds,
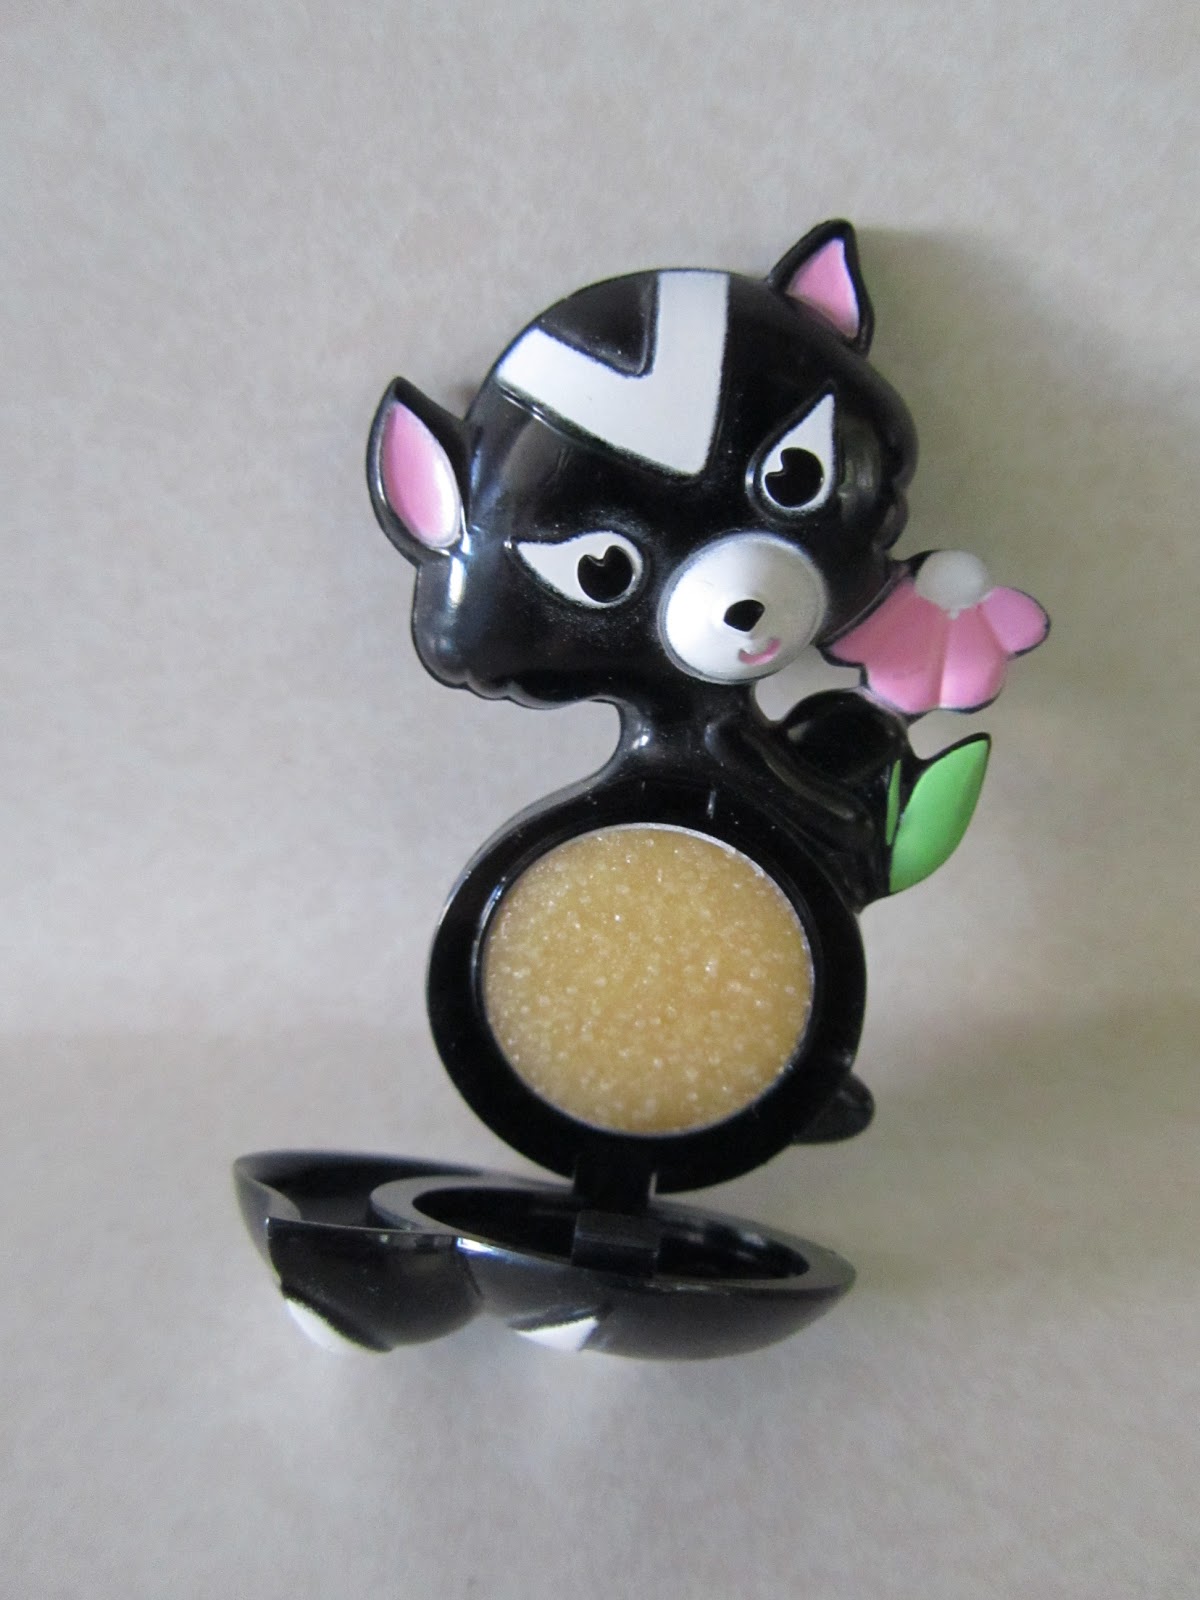
and dragged me to the local thrift store where I found this!!! 

I had this as a child and I LOVED this Avon perfumed pin!!
I know I made an audible squeal (something I don't usually do in public)
when I found this little gem in it's original box from ...1972!!
The stank perfume was still intact and untouched. I shudder to think I ran around
smelling like this, but it was probably better than my regular little kid stink.
Sometimes it's the littlest things.... 
 
And now for a little bitching session. 
 
I have hit a wall of funk in my paper crafting and have had enough of
talentless hacks stealing hardworking, brilliant authentic artist's works,
for their own personal profit and fame.
Papelitos Stamps is the culprit this time. Cris sold hundreds of stolen images
on her Etsy site and duped me and my friends into creating with the stolen goods as part of her design team. I had a bad taste in mouth over her "diverse styles" of images on her site,
so I reverse image searched her images on Google, and found numerous artists
linked to said images. I contacted the original artists and alerted them to the theft of their artwork. The ones I did hear back from (there were many) were shocked and pissed to say the least. Everyone denied giving permission to this douche to use or sell their images.
Unfortunately, I was not surprised, but rather disappointed as I had given Cris plenty of
chances to come clean. Only thing worse than a thief is a liar.
I have a zero tolerance policy for untruths. 
Now I feel as though I have wasted so much of my precious mojo on her projects.
I don't feel like creating anything digi related at all. 
I will shake off this funk and come out swingin'!
You have been warned.  


Wednesday, September 5, 2012

Zombie Strippers are awesome!!!

 
I am alive, but still a bit "off". Okay a little more "off" than usual.
But I did manage to actually produce something for this week's HDH challenge.
Bare Bones - no bumpy embellishments or dimensional creations this week.
More along the lines of a clean and simple, but cleanliness is not
really in my repertoire.
 
I went with a tag this week, featuring an insane image from
Rick St. Dennis. I was inspired to create a tag after watching a Stamp-tember tutorial
by Tim Holtz. It was perfect for this "non-dimensional" challenge, and it gave me
a reason to use some new stamps and more of my unused Ranger products. 

Who doesn't need/love a Zombie Stripper image?!!!
Isn't she just wonderfully wretched?!
I have a few RSD digis from last years designs, but he has come out
with so many new and horribly twisted Hallowe'en themed images this season.
I picked up a few more, with plenty still on my wish list.
He is a fabulous artist and just recently had a DT call on his blog.
Congrats to our own Croms, for her recent DT spot!!!
Check out her blog see what she created to really wow Mister St. Dennis.
   
I intentionally left off the seam binding ribbon at the top
for this photo. I didn't want any real dimension at all on this tag.
Rules is rules!
I had fun using Distress Inks to create my tag background, and adding
lots of strange and awesome stamps that I have been collecting for years.
I love all of the (non dimensional) layers and overall dirtiness of it. 
 
There is still plenty of time to come up with something flat, but not boring,
for our Bare Bones challenge.
Deadline is Sunday the 9th, at 3PM CST.


I am blissfully up to my neck in custom orders for Hallowe'en
and even Xmas right now. I've done a couple Zombie wedding cake toppers (one was featured on Foxnews.com), and I am currently working on a Zombie Batman and a
life-size Zombie hand for a cake topper. Not to mention brains, ghosts, bats
and candy corns!! If my posts are sparse, this is why.
It's a good thing.

Saturday, September 1, 2012

Ghostly Apparitions

I decided to make the best of the mucus that has been
killing me this week, and I made some little ghosties.
No, they're not made of mucus, but rather glow in the dark
polymer clay that resembles shades of phlegm.
Nice. And classy, too. 
 
I have added quite few miniature ghost ornaments and
ghostie sculpts to my Etsy shoppe today.
 
It's never too early to start shopping for
Hallowe'en!!!