Showing posts with label Hello Kitty. Show all posts

Saturday, December 29, 2012

Death's Head Hawk Moth and some Xmas left overs

Can I just say how happy I am for 2012 to end?
This year started out rather tragically, so the rest of the year was
spent trying to deal with losses and find my way back to reality.
I did manage to get my mojo back with the help of some wonderful
artists and their design teams. 
and Wicked Wednesday ATC challenge DT this year. I made new friends, and picked up some new techniques and perspectives as well.
This year was a painful one, but I have come out stronger for it.
Now, let's see what 2013 has in store for me.

Today, I have made an ATC for the WW ATC challenge of 
"skulls and skeletons".

Isn't he lovely?
I used this wonderful image from this week's sponsor,
Teri draws the most amazing and unique images!! Love that artsy wench!
I used some Distress Inks for the back ground, and then spritzed it with 
water to give it a washed look with water spots. I used a vector stamp from Stamper's Best to complete the look.
I wish I had left the skull white, or colored it in with a gel pen to make it pop.
Next time.

Now for some Xmas left overs.
I made some gift tags with Rick St. Dennis' wonderful Christmas images.

So fun and easy to color! They made perfect tags!

This one is my favorite. It is belatedly on it's way to it's
intended recipient, so just a peek for now. 

Now I have some gifts I'd like to boast about (c'mon, let's be real here).
I have relieved my husband of his gift buying duties and I think we are both much happier for it.
We've been together over 25 years, and you'd think we had just met by the gifts he has given me in the past. Don't get me wrong, he is a wonderful man who buys me flowers at least once a month for as long as we've been married (16 years). He ROCKS, and I am lucky to have him. Very lucky.
But I buy myself awesome schtuff with his money. 
He doesn't have to shop for me,
and I get exactly what want. 
Win, win!!

I love me some Frank Kozik. I love the Smorkin' Labbit graphic, so I had
to have this: 

This is what I saw first. I knew I wanted it!!!! Tee hee!

Then, I saw it was a Labbit!!!!
A 'Labbitus tigris rotundii' to be exact.

Oh yeah!!! A moustache!!! 
It was love, no matter the cost!!!  

I also purchased these (rather large) Hello Kitty head salt and pepper shakers.
Very cute, and quite substantial. Husband has banned them from the kitchen.
The toaster was a well fought battle. I love my toast with Kitty's face on it. 

This was a pleasant surprise from the father in law. Also a habitually bad gift giver in years past.
Not this year!! You really can't go wrong at the BevMo!! Nicely done, sir. Nicely done. 

I have to admit it was nice to spend the holiday with family. It was great to see all the kids growing into young adults, or just beginning elementary school. It was touching to see my Uncle Jim moving on with his
life after losing his wife earlier this year to brain cancer. He is also a brain cancer survivor. It was also difficult to witness our family patriarchs aging and becoming so small and fragile. Gotta cherish those moments though.
That's not to say that I "wasn't feelin' it" before we got there, but once the chaos began, I felt right at home.  
 The older I get, the more I cherish family. Life is short. 
Don't waste the time we have left on petty shit. 
Love them, despite them. 

Scary New Year!!

Sunday, July 24, 2011

Etsy find: RawkBalm

Since I have been a member of Etsy,
I have had the immense pleasure of meeting and doing business with
tons of brilliant and supportive people from all over the world!
I have met tons of like minded crafters and people who are
fans of art and handmade goods. I'd like to help
promote some of the shops that I enjoy and have had first hand
experience with.

This week I'd like to spotlight a killer shop called,

I happened upon this shop when this little number caught my eye!

Yes, that is Hello Kitty doing her impression of
Captain Spaulding from "House of 1000 Corpses" fame.
This awesome image sits atop a pot of organic beeswax lip balm.

When I received my order it was wrapped so cute I had to take a picture.

Like little candies!!

Future tattoo design? Maybe.

Who can resist a zombie kitty?

Total tattoo material right here.

Each pot of wonderfully smooth (not sticky or greasy) and
soothing balm comes in your choice of numerous delectable
scents, and your choice of image. Hayley will even add custom 
art or customer provided art to the lids too!
Perfect for a birthday party favor or a personalized bridal party favor.

Check out her shop and get your lips the best balm on Etsy!!  


Thursday, July 29, 2010

Glittered Acetate tutorial

I love colored glass, stained glass in particular.
When I first saw this technique that is immediately what came to mind.
I had grandiose plans of making some incredible stained glass images, but I have found that some images work better than others with this technique.
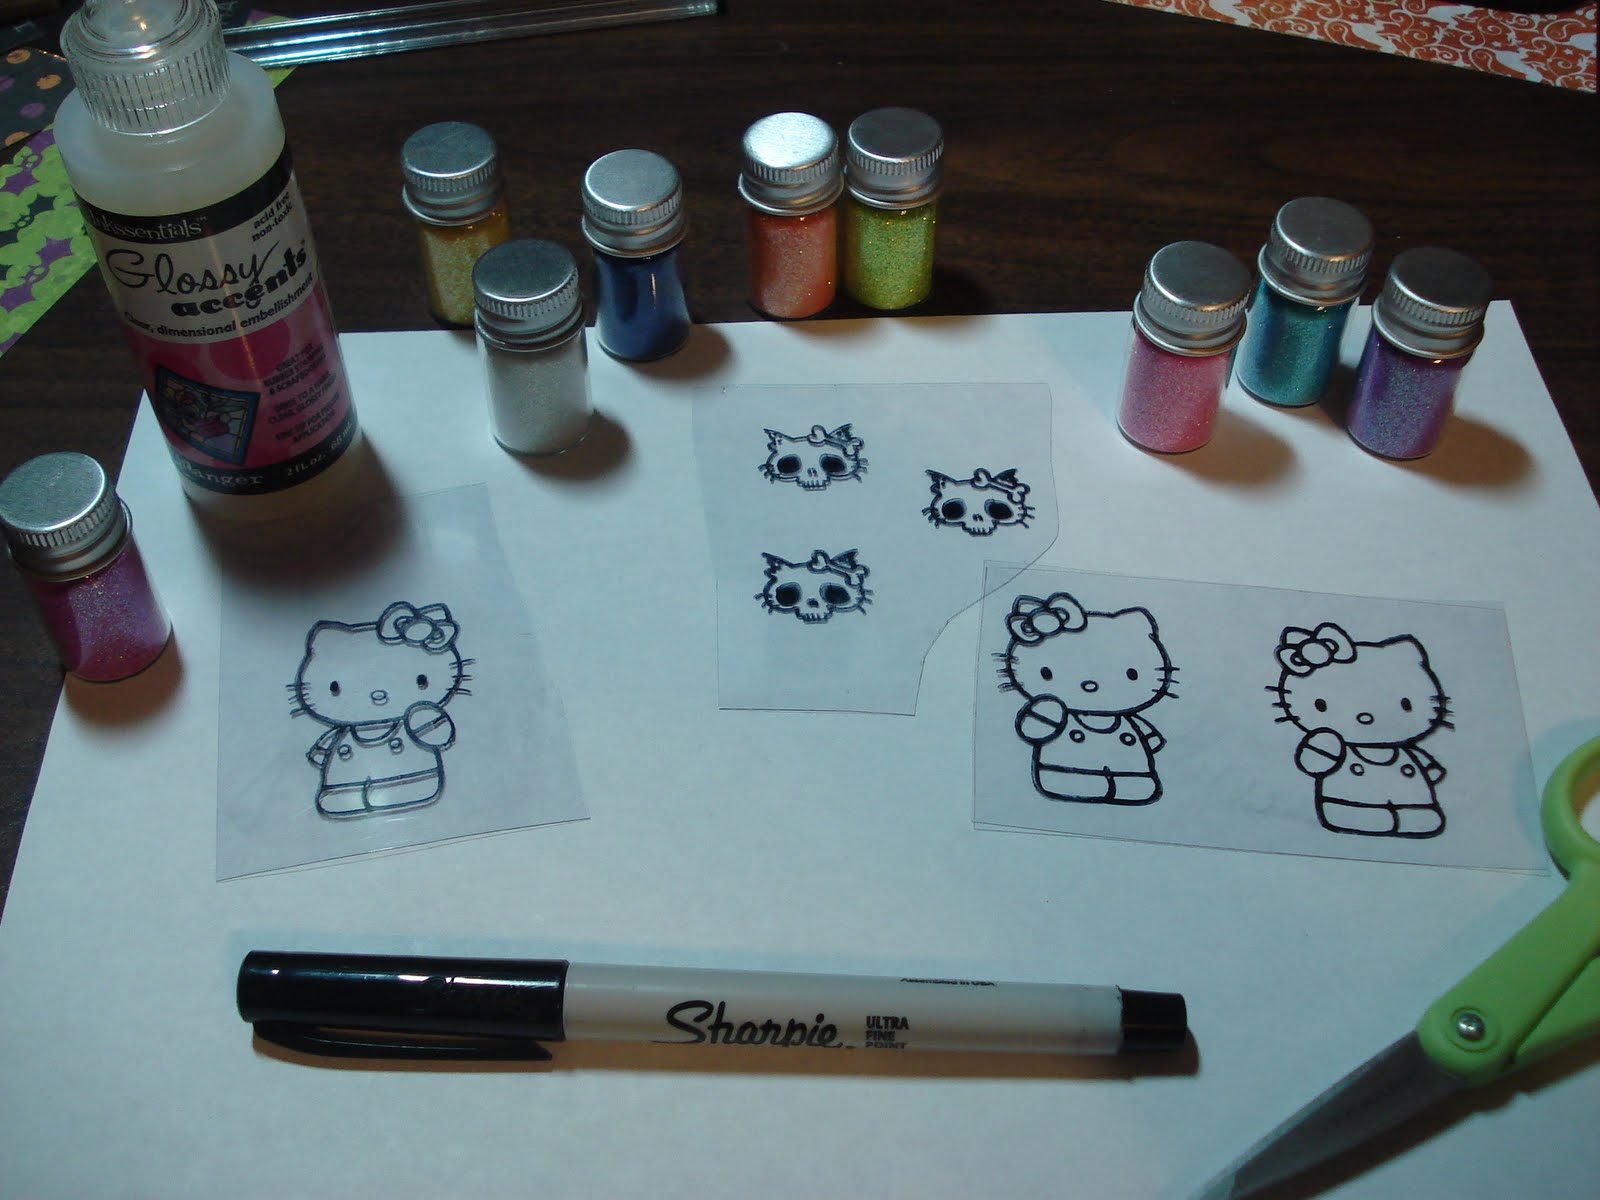
For my very first tutorial, I chose this simple Hello Kitty image from StampitCrazy.
I used StazOn ink and a sheet of acetate I found in my craft room. You can use any kind of acetate from overhead transparencies to the backing from stickers.
I've got all of my goodies out.
I have chosen my glitter colors (Doodlebug), got my Glossy Accents, scissors, and an extra fine Sharpie to fill in holidays (blank spots) in the stamped image.
Once you have stamped your image with StazOn and let it dry completely (about 3 minutes or so), flip it over and start putting Glossy Accents on the reverse side of the image where you want your first color.
I have colored her bow and shirt orange first.
I like to let the glitter sit in the Glossy Accents for a minute or two to give it time to soak in and give a more solid appearance, before I dump it back into the jar. I also hold it up to the light to see if there are any light spots that still need to be filled in.
I use a small paintbrush to remove any excess glitter before I add the next color. 
Adding white for her face and feet and hands.
Sometimes it is hard to keep the GA and the glitter confined to a small space.
No worries, just let it set up for a few minutes (not dried all the way though), and use a push pin or needle tool to carefully push the glitter and GA back into the desired space, or remove it completely and try again.
Finally, I add the black glitter for her overalls, and I let it all dry for at least 15 to 20 minutes.
Once it is all dry, you can carefully trim it out, and using either more
Glossy Accents, or another strong wet glue, adhere it to your project for lots of glittery gorgeousness!
Thanks for stopping by and if you decide to try this fairly simple technique, I'd love to see what you made!

Tuesday, July 27, 2010

Stamp it Crazy Anniversary

This month marks the one year Anniversary for the
Barb is also celebrating her Birthday, her husband's Birthday, and their
2nd wedding Anniversary.
Being the generous gal she is, Barb is offering up a ton of blog candy just for 
celebrating with her (and making a card using SIC stamps).
 
Even though I relish the creepy side of life, I am huge fan of the Kitty.
I have been a Kitty worshipper since I was about 8 years old.
I used to steal quarters from my Grandma and go to the Hallmark store and buy
Hello Kitty, My Melody, and Little Twin Stars crap all the time.
My Grandma was a waitress, and she kept quarters in a dish in her bathroom(?), so I'm assuming she just thought it was the commode spirits taking their share.
I digress...
Barb has this great stamp of Hello Kitty and I used it to make some really cute Halloween cards for the less gruesome of my friends.
I used this technique of stamping on acetate and using glitter and Glossy Accents to fill in the color.
{Tutorial to follow tomorrow.}
One wasn't enough.
Two still wasn't gettin' it.
Aaahhh! Third time is a charm!

Happy (belated) Birthday to Barb, and
here's to many more Anniversaries to come!  

Tuesday, March 23, 2010

Crackle glass effect - do's and don'ts

I have been very intrigued by the crackle glass technique I've been seeing quite a lot of lately.
I looked it up on Splitcoast and found some nice tutorials on the subject and this was what I managed to come up with.
 
I used this rad drawing I found online of the bone structure of Hello Kitty.
I decided to 'age' the image prior to adding the crackle glass effect.
I only figured this out AFTER I ruined a few images by adding the color to the piece after I cracked the glass.
   
Don't care for this look at all.
This one was kinda cool, but I still prefer the color added to the image before the crackle.
I used a minimum of 3 layers of the Ultra Thick Embossing Enamel. Then I popped it in the freezer for a few minutes, and when I took it out, I immediately started cracking the image. Once it begins to warm up, it stops cracking and just tears the paper if you're not careful.
Really cool technique. It would be really sweet with a stained glass-like image.