Showing posts with label Hallowe'en. Show all posts

Monday, August 4, 2014

Deja-Vu Doo for Macabre Monday

Happy Monday? No. 
Maybe not an especially happy Monday, but it is Macabre Monday, 
and that means the second week of the theme 
Deja-Vu Doo has begun.
The challenge is to revisit a relatively recent project or supply
and use it again, but in an entirely new way.

I decided to try my hand at another altered box.
I made this one a few weeks ago, in case you missed it. 
This time I went with a hinged coffin box made of wood.

I sealed the blank wood box with Americana sealer from DecoArt
before doing anything else. I've learned that this is beneficial to the overall
effects I am trying to achieve here. 

Next, I painted the box with a black acrylic paint. I applied two coats of the black
paint and let it dry completely (with the help of a heat gun), before applying the
Weather Wood medium. I used this project once before but didn't get good results.
Now I realize I misread the directions the first time, but I got it right this time.
The key is to apply a nice, even coat of the WW medium, ending up with a nice,
glossy finish. Let that dry completely. Try to be patient and let it dry by itself to avoid
burning the paint or the medium. Ask me how I know this....  

Once the Weathered Wood medium has dried completely, I chose a highly
contrasting color of acrylic paint. The key to getting a good crackled finish
is to apply a thin coat, quickly. And try not to go over the areas you have already
painted, as it decreases the crackled effect. Work fast, and in the same direction
as the wood grain. 

As a side note: I have had this paint for 17 years....

Once it was all dry, I was thrilled with the weathered effect, but that paint
color was just too garish, and bright for this coffin box.

So I made a wash of watered down brown paint,
and applied it, and wiped it off almost immediately, leaving it in the
recesses of the coffin for an aged effect. I think it toned that purple
down nicely. 

I still felt it was lacking a bit, so I added some
Inka Gold Metallic Rub in green yellow to all of the edges.
This really made it all pop.

I glued a bat I made (using polymer clay and a Martha Stewart mold)
onto the front of the coffin. I like the simplistic look of it. Since there is
so much going on with all the textures and layers, this felt right. 

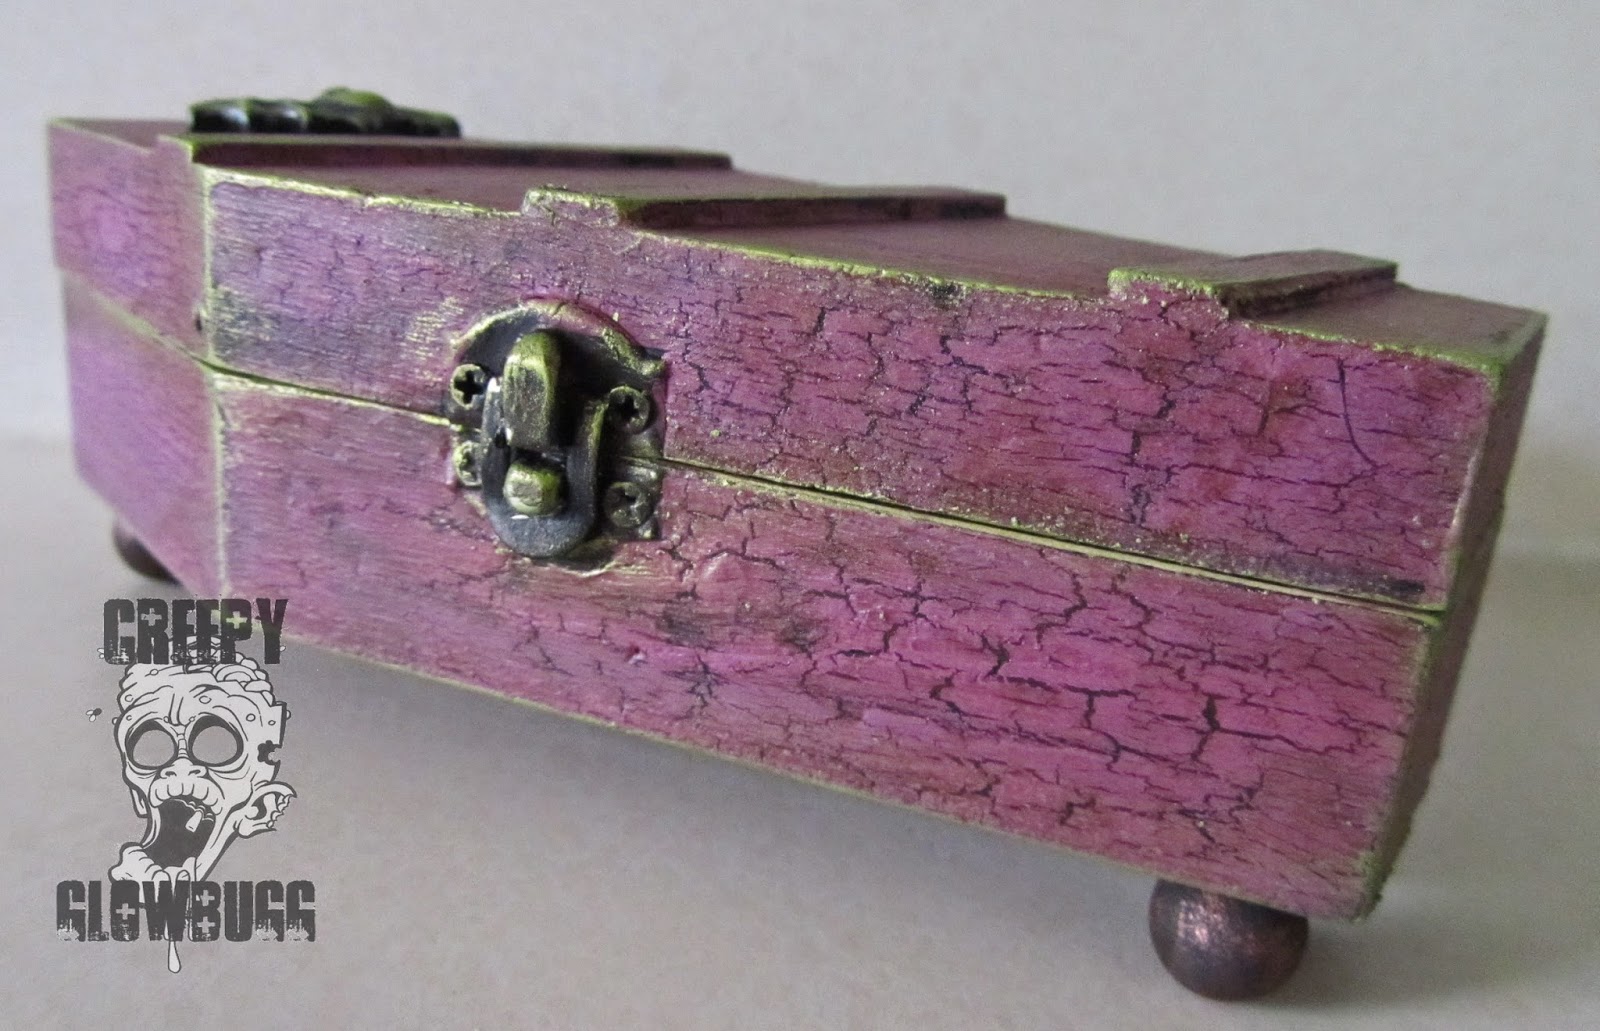
I glued some wooden balls to the bottom of the box for feet.
I think this makes it feel a bit more special than just a box that sits on it's bottom.

I decorated the inside of the box using various collage cuts from
Itkupilli and random stuff from my stash. 

It felt like something was missing, so I added some Tim Holtz Halloween rub-ons
to the edges of the box.  

Yup, that's what was missing. I like it. 


More rub-ons, and green metallic rub.

That's it for me. 
Thanks for stopping by today.

I'd like to enter this box in the following challenges:
Allsorts Challenges - Favorite Things
Halloween is my favorite thing in the entire world.
I bleed orange and black, 24/7.


Thursday, October 31, 2013

Happy Hallowe'en!!!!

Happy Hallowe'en!!!

Geesh! 
The day is almost over and I have barely even gotten started!
After getting my monster off to school this morning all decked out in his
finest Amanda Bynes costume and wig, I must have watched all of the 
Halloween movies back to back, starting at 7 AM. Nothing like a little
horror in the morning to get your day started off right!

  I did manage to complete a few Hallowe'en projects
that have been on my 'to do' list for quite a while.
Like this cute card featuring one of the sweetest Pumpkin Sprites ever,
and her kitty. The image is from Aurora Wings, by Mitzi Sato-Wiuff.
Mitzi is our sponsor this challenge at HDH, and she is also one of my favorite
artists. She has such a unique and beautiful style of artwork. I'm a huge fan.     

I have been trying my artistic hand at relief carving/sculpting.

This was my very first attempt. I thought I'd try to keep it
pretty simple. All made from white Sculpey polymer clay, painted in acrylics, 
and then some glitter and rhinestone bling was added. 

This is my second attempt at relief sculpting.
A little more involved this time around.

I'm still learning and acquiring the right tools, but overall,
I'm pretty pleased with this Lycanthrope.

This piece (and the other one, too) measure about 
2.5" x 3.5", like an ATC. I really like this type of sculpting quite a bit,
and I have some really cool ideas for lots more of these!

Thanks for dropping by, and 
Happy Hallowe'en!!! 

Friday, October 11, 2013

I'm on a roll!

What's this?! Two weeks in a row?
I must have that Hallowe'en fever that's going around!

This week's challenge theme at Dilly Beans challenges is....
Hallowe'en!!

Once again, I have chosen a witty word art from Ginger's House,
and paired it with probably my favorite and most used image from 
Dilly Beans called,  Monster Boy (#230).

After setting the usual color scheme with my Copics, I destashed this
cute skull border from Tim Coffey/K Designs. I also used some dp
that I could never figure out how or when to use previously.
Throw some rhinestones on it, and everything just kind of works.   

More destashing of glittered spider die cuts, and some awesome
and super cheap cheesecloth. Cheesecloth is perfect for conveying
a Hallowe'en, haunted feel to any project. You can bet you'll be seeing
more of it in the projects to come.  

Check out the other Dilly Beans Hallowe'en inspired projects 


Wednesday, October 9, 2013

Creepy, but cute.

Hallowe'en has kicked into full gear!
The smell of pumpkin candles and wet paint permeates the air in my house.
The race is on to finish all of the Hallowe'en projects on my numerous lists. 
Some may, but most won't see completion this year, at least.

The current challenge at Wicked Wednesday ATC challenges is 

I have used #483 Monsters for my Cute and Creepy ATC.
I colored the trio with Copics, fussy cut, and popped them up
from the shoulders up, with foam dots. I added a small
premade tag and some rhinestones. Lastly, I added some white
accents with a gelly roll pen. 
Ta-dah!

Thanks for stopping by!  

Sunday, September 22, 2013

I wanna be Steampunk Peg for Hallowe'en

The current challenge at Haunted Design House is
"Who are you supposed to be?",
and we're sponsored by 

I chose to work with the stunningly gorgeous

I would love to dress up in full Steampunk regalia
for Hallowe'en or any costume party! 

I used an EK Success web punch on a dictionary page, and daubed it with
some purple ink to match Peg's ruffles. I also used some Recollections glitter tape,
and some orange rhinestones for just the right amount of bling.    

Peg is colored with Copics, and Stardust Gelly Roll pen,
some Icicle Stickles were used on the netting of her hat.
Just a touch more bling. 

Thanks for dropping by.
Keep it Creepy!!

Friday, September 6, 2013

Hallowe'en is on it's way!!

I'm running a bit behind, but for a good cause.
Cause I was busy getting ready for the best holiday ever,
HALLOWE'EN!!!
It's no big secret that I bleed orange and black,
or that I was born into a family who relished the season.
It's in my DNA to be an Autumn People.

So first up, is my guest DT make for the Hallowe'en release at Simply B Stamps  
and for the layers challenge at Simply Steampunk challenges.
I have used the new "Jude Spook" image available here.

After a ridiculous amount of time, I got the boa trim to stay
behind the cool bat brad. Sometimes I spend way too much time on 
the teeniest of things. But I like how it looks, and that makes all of the
cussing and fussing worth it.  

I am stuck in a coloring rut of sorts. I just can't seem to color anything
in a Hallowe'en scheme, without the use of yellow greens, violets, and
yellow reds. Those colors just scream, "Happy Hallowe'en!" to me.  

I hope you'll stop by the Simply Steampunk blog to see the other
marvelous samples using the new images from Simply B Stamps,
and maybe make a layered project as well. 

Next up, is my make for the current challenge at Dilly Beans.
The new theme is buttons.
See what I mean about the color scheme?
I just can't help myself. It's a sickness.... 

I have a TON of buttons that I rarely ever use, so I tried to get as many
as possible on here. I managed to use six buttons. Not bad. 

 I have used the #406 "Worried Skellie" image.
I took some liberties with his eyes and the heart on his
shirt. I replaced them all with buttons in keeping with the theme. 
I also went to town with the white gel pen, too. Still getting the hang of it.

I hope you'll drop by the Dilly Beans Designer's challenge to see
all of the other wonderful samples and maybe even play along
using your Dilly Beans images and some buttons.  

Keep it creepy!!!

Saturday, September 29, 2012

I'm ready for Fall

I am so ready for Fall to begin.
I have been working on Hallowe'en schtuff all year, and now
I am ready for the weather to reflect the season.
It's supposed to be 99 degrees here tomorrow.
Boo. Hiss.
The challenge is Fall is in the air at Dilly Beans this week.

I decided to rebel against the weather and make a fall inspired
Hallowe'en card using #461 Halloween Skellie framed.
He is available at Dilly Beans Digi Stamps.
Okay, now I feel a little better.  
 
THIS makes me feel alot better though.

Yup! It's a Zombie Flamingo creepy lawn ornament!!!
One of my dearest friends picked it up for me at the Spirit Halloween store.
I have yet to check out Spirit this year. It has been kind of a disappointment the
last few years, so I may just skip it.
 
This Zombie flamingo is awesome, but the damn sticks that they provide
and the stupidly shallow holes for them to fit into, really irk me!!!
I ended up modifying him to accommodate a single stick right up the center.
Works better, but it sucks that they are selling them like this in the first place.
But, I am glad that they are selling these instead of the black ones with a stenciled
skeleton on the side. This is way cooler, although I did want the skellie ones
when I first saw them years ago.


Wednesday, September 28, 2011

Wretched Wednesday HDH108 You're Making a Scene!!!

Horrific Hump Day Haunters!!!
Can you feel the crispness in the air yet?
I can't. We're still flirting with the 90's here in California,
but I am getting a bit giddy with all of the Hallowe'en decorations
out in the stores.
A little retail therapy really helped my mojo this week.
I kinda went cwazy on this challenge.

HDH are challenging you to make a Hallowe'en inspired scene
for this week's Macabre Monday


We are very fortunate to be sponsored by
Since I am to lazy too make a step card, I decided to make a really
a labor intensive project instead. Using a thrift store frame,
lots of card board, some MS punches, lots of glitter and Spica pens,
and some awesome MIC digis, I have created a great scene!!

Okay, first I painted the thrift store frame with black, silver, and 
purple acrylic paints. I used black as the base coat and then
used a dry brush technique to apply the silver and purple paints.
While that was drying, I colored in the Mini Monztas from MIC
using Copics.  After fussy cutting the images I used a Spica pen to
go around the outside of the images for some Vampiric sparkle.

Now let's not forget that Haunted House! That detailed baby was
quite a work out! LOTS of details!!!!
I had to get out the magnifying specs for that one!
I layered in some QuicKutz and Martha Stewart graveyard
punches togive more depth to the scene.
I even managed to pop in a teeny tiny skull on one of the headstones!  
I popped everything up on corrugated cardboard in varying thicknesses.   

I topped off both of my Vampyres with Glossy Accents.
It makes them a bit more sturdy, especially the little
lady since she is outside of the glass.

I love this house image!!!
I Stickled the windows to make them sparkle,
and outlined the entire house in Sakura Stardust pen.
I also added some rhinestones. More sparkles!

I think this will make a nice addition to my Hallowe'en
decorations this year.

There is still time to play along with HDH this week.
If you like these images, they (and others) are up for grabs as this
week's prize schwag. But ya gotta play!  

Saturday, April 2, 2011

The Punkins are coming....

That's right, the Punkins are making their way
to my Etsy shoppe today!


I have many different Punkins to choose from and keep in mind,
they look great in a group!!!
"Mini Jacks"  jack-o-lanterns


Flourished Punkins

Even a couple of "Steampunkins" too!