Due to the coming Autumn season, I have chosen to step down from the RSD EDT
to get all of my ghosties and punkins in a row. This is my busiest time of year,
both creatively and personally, so I had to cut back a tad on my DT commitments.
I look forward to possibly doing a guest DT spot for RSD, sometime in the future.
I'd like to end my EDT membership by wrapping up on my coloring tutorial
for the beautiful RSD June freebie image, Desdemona.
In my previous tutorial here, I showed the versatility of skin tones,
and how they can completely transform an image.
Now I am going to show you how I color hair, makeup and eyes.
I have no formal or certified training with Copics. I just like to color.
I start out by using my darkest color, E09.
I try to fill in the darkest shadows of her hair.
I look for the inside of curls or the place where her hair comes
out from behind or under another layer of hair.
Next is YR09. I use it for her next medium shade.
I basically just follow the shadows and keep pulling color out
from the last color used.
Next is YR07. I just keep pulling the colors into the light.
YR04 for the lightest orange shade.
Not sure why my scanner went so light, but I have added Y35 and Y38
for my lightest golden tones and highlights.
Here she is with her eyes, flesh, and make up colored.
And now for the eyes and make up.....
I began with B04 for the darkest shadow of her iris. Her eyelid will cast the darkest
shadow at the top of her eye.
Next, I added B02.
And now, B01.
Lastly, I use B000 to blend all of the Blue shades together.
I wanted a little more contrast, so I added B06 to darken up her
iris a bit more at the darkest point.
Lastly, I used B66, B63, and B60 for her eye make up and lip color.
I also use the lightest skin tone (this one is E30) to blend it all out and make it
appear sorta natural despite the unnatural color choices.
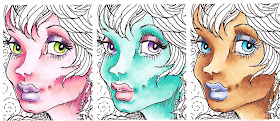
Here are some other color samples using the very same techniques each time.
I used YRs for the purple version, RVs for the green gal, and BGs for the red chick.
I am loving how the purple skinned chick came out.
Must be the Hallowe'en colors....
I used YG and V for the pink flesh tone, and V and RV for the blue/green flesh tone.
Well, that's gonna do it for me today. I will miss working with the entire RSD
family, but I'll be stalking all of them on their blogs and facebook pages.


Hi glow. Sorry to see you go. I love your coloring. You don't need a certicate to color. That's just a stupid thing to make people pay for a certificate to give coloring lessons ysing copics. I have seen people wearing the copic certified badge on their blogs that did a terrible job with those markers. Your coloring is awesome!!!
ReplyDeleteLOVE it. Fab tutorial and I have waited for the longest time for one from you!! x
ReplyDeleteHoly Cow!!! Thanks for the tutorial - and I love how you blended the other 'facial' colors. SOOO good.
ReplyDeleteI'm going to bookmark this page!
Another fab tut, Glo! They're gonna miss you over at RSD, for sure. Your coloring ROCKS! xxD
ReplyDeleteIt looks fantastic!
ReplyDeleteOooohh! This is fabulous! The image looks completely different once you have worked your coloring magic and I love the variations you included at the end! Plus look at all those added shadows that give her face such dimension and depth. You're a copic wizard!
ReplyDelete